
Crile vs Kelly Hemostatic Forceps: Jaw Serrations
Conventionally, Kelly has distal-half serrations and Crile has full-length serrations. Open the jaws, then verify the exact model if the label conflicts.
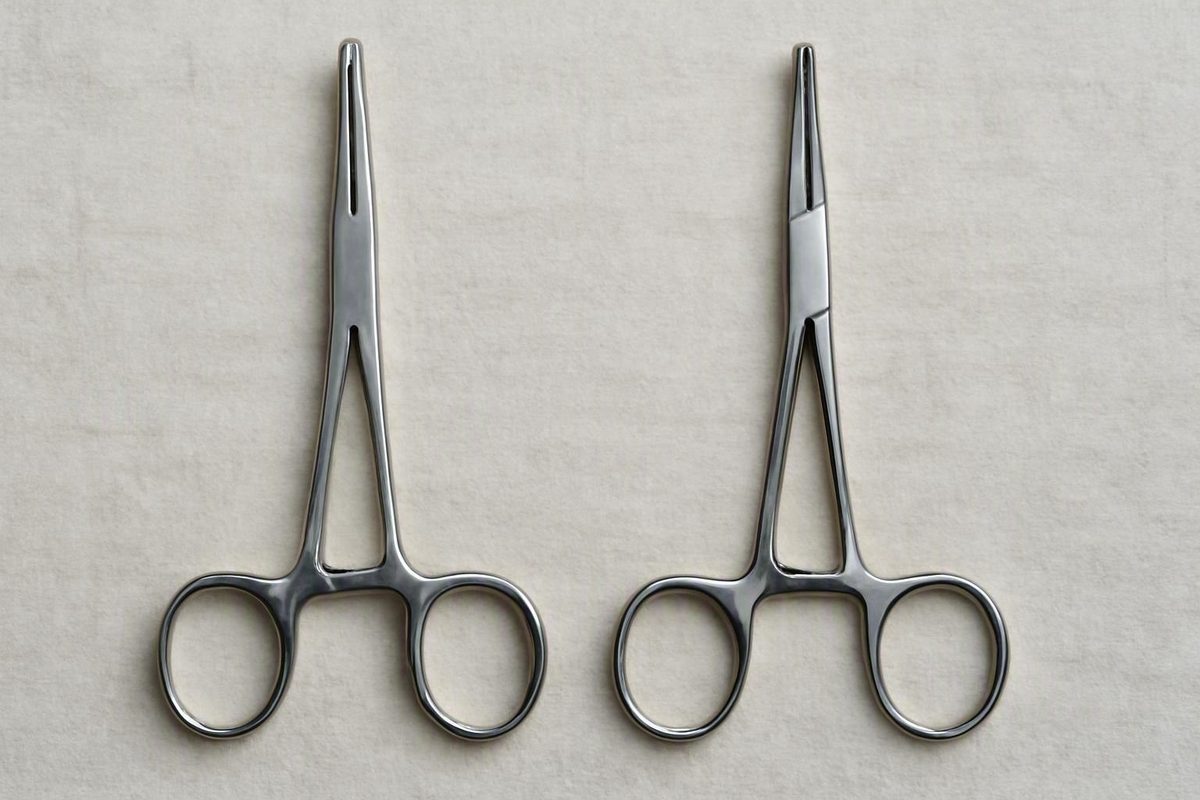
The short answer: half-serrated Kelly, fully serrated Crile
The conventional difference between Kelly and Crile hemostatic forceps is the extent of the transverse serrations inside the jaws:
- Kelly: Serrations cover the distal half of each jaw, leaving the proximal half comparatively smooth.
- Crile: Serrations extend along the full working length of each jaw.
Open the instrument and inspect the inner jaw surfaces. That is the clearest visual test; the conventional half-serrated-versus-fully-serrated distinction is consistently described in instrument education materials, including the University of Guelph’s Veterinary Surgery Online guide.
| Feature | Conventional Kelly pattern | Conventional Crile pattern |
|---|---|---|
| Serration extent | Distal half of each jaw | Full working length of each jaw |
| Identification value | Strongest distinguishing feature | Strongest distinguishing feature |
| Handle and lock | Ring handles with a ratcheted locking mechanism | Ring handles with a ratcheted locking mechanism |
| Jaw configuration | Commonly straight or curved | Commonly straight or curved |
| Common standard example | Often about 5.5 inches, or 14 cm, but model dimensions vary | Often about 5.5 inches, or 14 cm, but model dimensions vary |
| General role | Clamping vessels or suitable tissue and assisting with bleeding control | Clamping vessels or suitable tissue and assisting with bleeding control |
| Reliable identification method | Inspect the open jaws and verify the model | Inspect the open jaws and verify the model |
| Unreliable as a sole identifier | Curvature, total length, or broad use claims | Curvature, total length, or broad use claims |
The two patterns otherwise overlap substantially. Both are locking, ring-handled hemostatic forceps. Both may be straight or curved, and both are sold in model-specific lengths and jaw profiles.
That overlap is why a closed hemostat can be difficult to identify at a distance.
The physical design distinction is much better supported than claims about comparative performance. Full-length serrations do not, by themselves, prove that a Crile grips more strongly, slips less, or causes more tissue trauma. Partial serrations likewise do not prove that a Kelly is gentler, more precise, or appropriate for a particular vessel size. The supplied evidence does not include controlled comparative data establishing those conclusions.
The practical rule is simple: identify the pattern from the open jaws first, then evaluate the exact model, condition, and intended use separately.
What Kelly and Crile forceps have in common
Kelly and Crile forceps look similar because they belong to the same broad instrument family. Both are hemostatic forceps constructed from two hinged members with opposing jaws, elongated shanks, finger rings, and an interlocking ratchet.
A few instrument terms make the comparison easier:
- Jaws: The working ends that close against one another. Their inner surfaces may be serrated, smooth, toothed, or otherwise configured.
- Serrations: Fine ridges across the inner jaw surfaces. In the conventional Kelly-versus-Crile comparison, the important question is how far they extend.
- Shanks: The sections between the jaws and the handles.
- Box lock: The hinged joint where the two instrument halves cross and connect.
- Ratchet: The interlocking teeth near the finger rings that hold the instrument at incremental closed positions.
- Finger rings: The ring-shaped handles used to open, close, and lock the instrument.
- Distal: Toward the tip.
- Proximal: Toward the box lock and handles.
As the handles close, the ratchet teeth engage in steps, allowing the jaws to remain closed without continuous hand pressure. Actual use depends on the instrument, tissue, procedure, manufacturer instructions, and trained user.
Both patterns are broadly described as instruments for clamping vessels or suitable tissue and assisting with bleeding control. Hemostats may also be used for appropriate tissue handling or exposure where a procedure calls for it. A professional overview of hemostat construction and general functions describes the common ring handles, ratchet, box lock, variable jaw configurations, and general instrument roles.
Both Kelly and Crile patterns may have straight or curved jaws. They also appear in more than one length, with differences in jaw delicacy, tip profile, shank proportions, and finish. Two Kelly models therefore need not be identical to each other, just as two Crile models may differ.
For scale, Kelly and Crile forceps are generally larger and less delicate than mosquito hemostats. That comparison helps place them within the hemostat family, but it does not establish interchangeability. Mosquito, Kelly, and Crile instruments may all be locking hemostats while differing meaningfully in size, jaw design, and specified role.
Their shared construction explains the identification challenge: when the jaws are closed, the decisive serration field may be hidden. Ring handles, curvature, and a ratchet can indicate that an item is probably a locking clamp, but those features do not distinguish Kelly from Crile by themselves.
A step-by-step visual identification check
Use the following sequence for non-clinical identification in an instrument room, classroom, processing area, receiving department, or purchasing review.
-
Confirm the broad instrument category. Look for two finger rings, crossed shanks, a box lock, opposing jaws, and an interlocking ratchet. This establishes that the item is consistent with a ring-handled locking hemostat, not its exact pattern.
-
Release the ratchet and open the jaws. Do not attempt to assess serration coverage through a narrow gap. Open the working end enough to see both inner jaw surfaces clearly, following applicable handling procedures.
-
Orient the instrument. Locate the distal tip and the proximal jaw area near the box lock. “Half serrated” refers to the approximate working length of both jaws, not to one serrated jaw paired with one smooth jaw.
-
Find the transverse serrations. Under adequate light, look for the fine ridges crossing the inner jaw surfaces.
-
Trace the serrated field toward the box lock. Do not inspect only the tips, because both conventional patterns are serrated distally. The useful question is where the ridges end.
-
Recognize the conventional Kelly pattern. If the serrations occupy approximately the distal half of the jaws and stop before the proximal working area, leaving a smoother section near the hinge, the instrument follows the conventional Kelly pattern.
-
Recognize the conventional Crile pattern. If the transverse serrations continue throughout the inner working surfaces, including the proximal jaw area, the instrument follows the conventional Crile pattern.
-
Record curvature separately. Note whether the jaws are straight or curved, but do not use curvature to choose between Kelly and Crile. Both patterns commonly occur in either form.
-
Check markings and documentation. Look for an etched manufacturer name, product number, catalog designation, and other traceability information. Compare the instrument with current manufacturer specifications and photographs rather than relying only on memory or an abbreviated reseller title.
-
Escalate ambiguity instead of guessing. If the jaw geometry does not agree with the name, the serrations cannot be assessed confidently, or the item appears to be a modified pattern, follow the facility’s established identification process.
A useful teaching image should show matched, open-jaw close-ups at the same scale and angle. The distal and proximal regions should be labeled, and a line should mark the endpoint of the serrated field. In the conventional Kelly image, the smooth proximal area should be clearly visible. In the conventional Crile image, serrations should continue through that same area.
Closed-instrument photographs can help learners recognize the general family, but they should not be the only images used to teach this distinction.
Size, curvature, and other features that do not settle the identity
Common standard examples are often listed around 5.5 inches, or approximately 14 cm, but that is not a universal specification. Supplier material reports overlapping dimensions and notes that hemostatic forceps are sold in multiple lengths and jaw configurations; one guide, for example, places Kelly forceps in an approximate 14–16 cm range.
Because reported dimensions overlap, length is a secondary clue. A 14 cm instrument is not necessarily a Kelly, and a longer or shorter instrument is not necessarily a Crile. Length becomes useful when matching an instrument to a documented catalog model, tray specification, or purchase record—not when defining the pattern in isolation.
Curvature is similarly non-decisive. Both conventional patterns may have:
- Straight jaws
- Curved jaws
- Model-specific differences in the degree of curvature
- Different jaw lengths or proportions
- Delicate or heavier profiles
Curvature is a model configuration that may be relevant to access and procedural requirements. It does not prove the instrument’s pattern. Rules such as “curved means deep” or “straight means superficial” should not be treated as universal indications or identification criteria.
The same caution applies to jaw thickness, shank length, finish, and overall handle shape. Those characteristics may help distinguish exact models when documentation is available, but they can vary by manufacturer.
A practical hierarchy of identification evidence is:
- Serration extent: Do the ridges stop around the midpoint or continue throughout the working jaws?
- Exact manufacturer and product number: What does the current catalog specify?
- Complete jaw profile: Is it conventionally serrated, smooth, toothed, delicate, or otherwise modified?
- Curvature: Is the model straight, curved, angled, or otherwise configured?
- Total length and jaw dimensions: Do the measurements match the documented product?
- Catalog name: Does the label agree with the actual geometry?
The first item identifies the conventional Kelly-versus-Crile pattern. The remaining items verify the particular model. Separating pattern identity from model configuration prevents size and curvature from receiving more diagnostic weight than they deserve.
Do their clinical uses actually differ?
Both Kelly and Crile forceps are broadly described as hemostatic instruments used for vessel clamping, suitable tissue handling, and bleeding control. Their selection and use remain subject to professional training, the procedure, manufacturer instructions, instrument-set requirements, and institutional policy.
Beyond that broad overlap, commercial descriptions are inconsistent. Some vendors associate Kelly forceps with larger or more superficial vessels while assigning Crile forceps to smaller vessels or more delicate work. One commercial Kelly-versus-Crile comparison makes those assignments while also reporting overlapping lengths and straight or curved versions of both patterns.
Other commercial descriptions associate Kelly forceps with larger vessels or tissue bundles and attribute a strong grip to the Crile pattern. These are product or market descriptions rather than controlled comparative findings; one example appears in a vendor guide to hemostatic-forceps types.
Those descriptions should not be combined into a universal clinical rule. They do not establish a validated boundary at which one pattern becomes appropriate and the other inappropriate. Nor do they show that either pattern produces better clinical outcomes.
The design difference may invite plausible assumptions, but an assumption is not measured evidence:
- Full-length serrations are not proof that a Crile provides greater retention, produces more pressure, slips less, or causes more tissue injury.
- Distal-half serrations are not proof that a Kelly is gentler, causes less crushing, or offers better precision.
- A vendor’s vessel-size assignment is not automatically transferable to every model sold under the same pattern name.
- The dimensions and construction of the exact instrument may be more relevant than a broad family label.
A cautious selection framework considers:
- The exact manufacturer and model
- Serration extent and complete jaw profile
- Jaw length, width, delicacy, and curvature
- The vessel or tissue characteristics
- Required access and exposure
- The procedure being performed
- Manufacturer instructions for use
- The designated instrument-set specification
- Institutional policy and preference-card requirements
- The trained user’s judgment
Identification and selection should remain separate tasks. Recognizing a conventional Kelly pattern establishes its partial serration field; recognizing a conventional Crile establishes full-length serrations. Neither observation, by itself, establishes suitability for a specific application.
Similar appearance also does not justify automatic substitution. If a tray list, procedure, manufacturer instruction, or institutional specification calls for a particular pattern or model, verify that requirement rather than assuming that any similarly sized locking hemostat is equivalent.
Why catalog names and textbook patterns do not always match
“Kelly is half serrated; Crile is fully serrated” is best treated as a conventional identification rule, not as a guarantee that every catalog item bearing either name will match the simplified textbook pattern.
A documented example shows why the name alone may be insufficient. B. Braun lists model BH183R under the combined designation “FRASER-KELLY (CRILE)” and describes it as curved, delicate, serrated, reusable, and 180 mm, or 7 inches, long in the manufacturer’s product listing.
That listing demonstrates nomenclature overlap for one model. It does not establish that Kelly and Crile are universally synonymous. The listing also does not specify whether the serrations cover half of the jaws or their full working length, so the compound name cannot replace inspection of the actual geometry.
Supplier descriptions also document models with differing dimensions, tip configurations, or jaw profiles. Such examples should be evaluated individually rather than used to make broad claims about every instrument carrying a traditional pattern name.
For purchasing, receiving, assembly, and inventory work, verify:
- Manufacturer
- Exact product number
- Total length
- Jaw length and profile
- Serration extent
- Tip design
- Straight or curved configuration
- Delicate, standard, or heavier construction
- Current catalog photograph
- Current manufacturer documentation
Archived catalogs, purchase records, and preference cards may help establish what was intended, but the instrument in hand must still match the required specification.
Identification warning: Identify the instrument in hand, not merely the name on a preference card, tray list, package label, or reseller page. If the name and jaw geometry conflict, stop and verify the exact model.
This approach avoids two opposite errors: forcing every manufacturer-specific instrument into a simplified textbook definition, or discarding the conventional serration distinction merely because one catalog uses overlapping terminology.
Inspection, reprocessing, and safe handling basics
Identification provides an opportunity to inspect instrument condition, but this section is not a complete reprocessing protocol. Follow the instrument manufacturer’s instructions for use and the facility’s validated cleaning, disinfection, inspection, packaging, and sterilization procedures.
Under adequate light—and magnification when required—inspect:
- Whether the jaws align correctly
- Whether the tips meet as intended
- Whether the serrations are visible and intact
- Whether residue remains in the serrated surfaces
- Whether the ratchet engages and releases correctly
- Whether shank tension or wear appears abnormal
- Whether cracks or damage are visible near the box lock
- Whether markings remain legible for identification and traceability
Hemostatic forceps are subject to wear. Routine inspection should include jaw alignment, shank tension, and ratchet condition. An instrument with misaligned jaws, a defective ratchet, or a crack near the box lock should be removed from service through the facility’s established process.
Pay particular attention to the serrated field. The smooth proximal area expected on a conventional Kelly should not be mistaken for serration loss caused by damage. Conversely, residue, staining, or surface marks should not be mistaken for a full-length Crile pattern.
Subject to the applicable manufacturer instructions and validated facility procedure, ratchets should remain open during cleaning and steam sterilization. The open position allows cleaning agents or steam to reach instrument surfaces and helps reduce the risk of stress-related damage. The same guidance warns that repeated over-clamping of tubing can damage the box lock and recommends a purpose-designed tube-occluding clamp instead of an ordinary hemostat (Hemostats 101).
Condition takes priority over correct naming. A correctly identified Crile with a defective ratchet is still unsuitable for service. A correctly identified Kelly with misaligned jaws still requires removal and evaluation. Pattern, exact model, condition, processing status, and procedural suitability are separate checks.
A practical identification and verification checklist
Before labeling, purchasing, assembling, issuing, or using a suspected Kelly or Crile, verify the following:
- [ ] Confirm locking-hemostat construction: Look for two finger rings, crossed shanks, a box lock, opposing jaws, and a ratchet.
- [ ] Open the jaws: Do not identify the serration field while the working surfaces are concealed.
- [ ] Inspect serration coverage: Determine where the transverse ridges end.
- [ ] Apply the conventional rule: Distal-half serrations indicate a Kelly pattern; full-jaw serrations indicate a Crile pattern.
- [ ] Record curvature: Note straight or curved as a model configuration, not as proof of identity.
- [ ] Verify length: Measure the instrument or compare it with the documented specification.
- [ ] Read the markings: Record the manufacturer, etched name, product number, and available traceability information.
- [ ] Consult current documentation: Compare the instrument with the manufacturer’s description and photographs.
- [ ] Inspect alignment and condition: Check the jaws, shanks, ratchet, and box lock under the facility’s inspection process; routine attention to alignment, tension, and ratchet wear is recommended in instrument inspection guidance.
- [ ] Confirm the required model: Ensure that the pattern and configuration match the tray, purchase, or procedural specification.
- [ ] Resolve conflicts: If the name and geometry disagree, do not guess or substitute. Escalate through the facility’s established identification process.
Do not use alleged vessel-size preferences, grip strength, tissue trauma, slippage, or precision as identification criteria. Those performance and application claims are inconsistent or unsupported by comparative evidence, whereas serration coverage is directly observable.
For category-level context—including distinctions among hemostatic, thumb, tissue, and sponge forceps—Medical Forceps lists a broader surgical-forceps identification guide.
This checklist supports instrument recognition and verification. It does not replace professional training, manufacturer instructions, institutional policy, or procedure-specific clinical judgment.
Frequently asked questions
Do Crile forceps have serrations along the entire jaw?
Conventionally, yes. A standard Crile pattern has transverse serrations extending along the full inner working surface of each jaw. A conventional Kelly has serrations on the distal half, with a smoother proximal section nearer the box lock.
Because manufacturer terminology and model geometry can vary, confirm the instrument itself and consult exact product documentation rather than assuming that every item labeled “Crile” follows the textbook pattern.
Are Kelly and Crile forceps usually the same length?
Their common sizes overlap, and standard examples are often similar in length. They are not universally identical, however. Manufacturers offer different dimensions and specialty configurations.
Record length as a model specification rather than using it as the principal way to distinguish Kelly from Crile.
Can both Kelly and Crile hemostats be straight or curved?
Yes. Both conventional patterns are commonly available with straight or curved jaws. Curvature describes the configuration of a particular model and may be relevant to access or procedural requirements, but it does not establish the pattern.
To distinguish them visually, inspect the extent of the serrations inside the open jaws.
Is a Crile proven to grip better or cause more tissue trauma than a Kelly?
Not by the comparative evidence reviewed here. Commercial descriptions sometimes claim that full-length serrations improve grip or that partial serrations reduce crushing, but the supplied evidence does not include controlled comparisons of retention, pressure, slippage, tissue injury, or clinical outcomes.
Serration extent can identify the conventional pattern. It should not be converted into an unsupported conclusion about superior performance or tissue effects.
Can Kelly or Crile hemostats be used to clamp surgical tubing?
An ordinary Kelly or Crile should not replace a purpose-designed tube-occluding clamp when tubing must be clamped. Repeated over-clamping with an ordinary hemostat may damage the box lock; professional instrument guidance recommends using the instrument designed for tubing instead.
Follow the tubing manufacturer’s instructions, the clamp manufacturer’s instructions, and the facility’s applicable procedure.
The rule worth retaining is straightforward: open the jaws. Distal-half serrations indicate the conventional Kelly pattern; full-length serrations indicate the conventional Crile pattern. Then verify curvature, length, markings, product number, manufacturer documentation, instrument condition, and local requirements.
Design identification is well supported. Universal claims about superior grip, reduced trauma, ideal vessel size, precision, or better outcomes are not. When a label and the actual geometry conflict, verify rather than guess or substitute. This material is educational and does not replace professional clinical training, as stated in the site’s terms.